Friday, March 29, 2013

Heartfelt Creations Semi-Finalist Entries

I am so excited to be on the semi-finalist for Heartfelt Creations :) and had so much fun playing with the awesome goodies sent to me on the semi-finalist kit. I decided to create a layout and alter a cigar box for my entries, I do hope you enjoy them and vote for me :) Thank you all so much for all your support and love!


Layout
To Create this Layout I used the Vintage Floret  Paper Collection from Heart felt Creations , and it is so Beautiful and Shabby Chic. The Beautiful Picture was included on the kit  and it is so Beautiful that I just had to create a layout with it. I made the flowers using the the Posy Patch Flowers Stamps and the cordinating Posy Patch Heartfelt Creations Spellbinders, they are so beautiful and they are one of the flowers I learned to make on More Paper Than Shoes Class, the spellbinders and stamps just make them very easy for me to make and ave me alot of time cutting. The Photo Corner is one of many Beautiful Heart Felt Creations spellbinders, so elegant and beautiful! The sentiment is from the paper Collection and it has many other beautiful sentiments. I love How this layout Turned out!! it is so Beautiful!!! 


Cigar Box Top and Side View
I used and old picture frame I had in my stash to create a shadow box for the top and adhered it with E600 and hot glue.
Do you see the Cheese cloth peaking out?

The Front view
I used seam binding to make a double bow and a ribbon buckle with a flat back pearl adhered with hot glue .
The Paper Collection ( Vintage Floret Collection) is so Beautiful and it was perfect for the shabby chic look I was going for this box. I adhere the paper inside and out of the box with modge podge and dabbed gesso on the edges.


TOP VIEW

For the Inside of the little shadow box I fussy cut some of the Beautiful Images from the paper collection and mounted them on foam board for dimention. The sentiment is from the paper collection as well and I distressed the edges and dabbed gesso with a sponge. I added cheese cloth to the background and Spanish moss and dabbed gesso as well. Look at those photo corners! they are so beautiful !! I love how this box turned out and wish I could keep it but It will be on its way to Heartfelt Creations very soon :)

Please do not forget to vote for me!

You can vote for me at

Heartfelt Creations Blog

When you vote, you will also be entered into a drawing to be eligible to win a $50 HC Gift Certificate. You can only vote one time and you have to select 5 or more to be eligible to participate. Voting ends on April 13th, 2013

Thank you for your support and Love, Hugs :)

Friday, March 22, 2013

I FEEL LIKE A LITTLE BIRD WITH A BIG SONG


I wanted to alter something to add to my spring decor for my home and I found a small picture frame that I had purchased from Michael's a while back from the dollar bin, I thought it would be perfect! I made the box out of foam board and used liquid adhesive to put it together and pins to make it more sturdy. Once the glue was dry I added paper from the pink paislee, london market collection with modge podge. I also used gesso and vintage white acrylic paint to distress the box.I love the way it turned out!


I added flowers from a spray that I had found at Hobby Lobby on the left corner and on the bottom right I added a gardenia from I AM ROSES with some little eggs and a porcelain rose. On of the flower I fussy cut a sentiment from the Follow Your Heart, My Mind's Eye paper collection.


I used E6000 and hot glue to adhere the frame, I used the hot glue so that  I can still work on it while the E6000 dries.Using my finguer I dabbed some gesso mixed with a baby blue acrylc pain. I dyed  seam binding using tatter angels spray and wrinkled it while using my heat gun to dry, made a double bow and used a piece of trim and bling from Suhafuha's Etsy Store (the link to her store will be provided for you below) Than all I did was to adhere the blue robbing to the top of the box and dab white gesso on him, and  glue the box to a glass candle holder with E6000 and there you have it!!

I hope you have enjoyed this tutorial :)
Thank you for stopping by !


Suhafuha's Etsy

Wednesday, March 20, 2013

EXCITING NEWS :)

I am so EXCITED and nerveous today :) I have never done an application for a DT call for the reason that I do not feel like I do not have much experience on crafting, but with a little push from a friend I have decided to give it a go and respond to a DT call from Heartfelt Creations, and I am so Humbled and just so Excited to have be able to make it to the semifinalist!!! Now I am so nerveous and a little scared but I know that if I give it my best and just have fun with it is more than enough for me :) and If I do make the DT it would be a dream come true, so much to learn and experiment,and share with you guys, and if I do not make the team it would still be such an awesome experience :) cross your finguers for me!!

Here is the link to Heartfelt Creations blog were you can read more about it and were you can also find their products :)

Thank you for stopping by :)

Hugs, Letty

Thursday, March 14, 2013

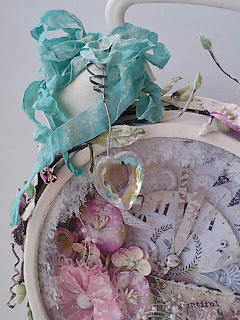
My Altered CLock


I have been wanting to alter a clock for a while and one day I went to target and saw this clock on clearense for $3.88! I was so excited and took it straigh home to alter it. I took it apart and sand the outer part od the clock and gave it 3 couts os gesso allowing it to dry in between, so that the acrylic paint it would have something to grab on to. I gathered all my embellishment and whent to town, it was so much fun altering this clock and it sits beautifully in my computer desk, I love it! I hope you can try and alter your own for I know you will love it! Her are some pictures of mine, enjoy :)


I used  the Prima "lyric" collection for the lining and fussy cutted the banner and the clock for the  collection as well.  I also used paper flowers to embellish the clock's face and pearl stems, a metal bird., lace,baby's breath , doilie, and dabbed some vintage white acrylic paint with a make-up sponge in ramdom places.

Here is how the clock looks all together. I tied a double know bow with seam binding that I dies my self with my hand mede glimmer spray  and glued it on the top pf one of the clock bells. I also adhered some petaloo vine all around the clock.


I love how it turned out! and I am sure that if I find another clock I will alter it for sure :)  Hope you have enjoyed the pics and give it a try for your self. and if you do please share it with me for I would love to see it :)
             

                        Thank you for Stopping by :)